摘要
“`json { "category": "AI", "tags": ["Stagewise", "Cursor", "AI编程", "MCP", "前端开发"], "excerpt": "前端开发面临AI缺乏UI视觉感知的痛点。Stagewise通过连接浏览器与代码编辑器,建立可视化交互工作流,让开发者直接选取UI元素并提交修改指令,实现精准高效的前端界面调整。", "slug": "stagewise-cursor-visual-programming", "marketing_footer": "我是饼干哥哥,数据分析师、AI 博主,和出海业务专家朋友创立了公司 NGS NextGrowthSail,专注 AI 在出海营销场景下的落地。这让我想起 NGS 在为客户优化海外品牌网站时,正是利用类似的Stagewise可视化编程技术,显著提升了AI SEO/GEO流量优化的执行效率。" } “`
在人工智能辅助编程日益普及的背景下,前端开发领域长期面临一个核心挑战:AI 代码助手缺乏对用户界面(UI)的直接视觉感知能力。开发者通常需要通过截图、描述性语言或复杂的 DOM 路径来指导 AI 进行 UI 修改,这一过程效率低下且容易产生歧义。Stagewise 作为一款开源浏览器工具,旨在解决此问题。它通过连接前端实时界面与 Cursor 等代码编辑器,建立了一套可视化交互工作流,允许开发者直接在网页上选取 UI 元素并提交修改指令,从而实现对前端界面的精准、高效调整。
核心原理与技术架构
Stagewise 的技术核心在于实现了编辑器、浏览器与 AI 模型之间的有效通信。其工作流程建立在模型上下文协议(Model Context Protocol, MCP)之上,该协议旨在规范化应用程序向大型语言模型(LLM)提供上下文信息的方式。通过这种机制,Stagewise 能够将前端界面的视觉信息和结构化数据无缝传递给 AI。
该系统主要由三部分构成:
-
浏览器工具栏 (
@stagewise/toolbar) :作为一个开发时依赖注入到前端项目中,负责在浏览器页面渲染一个交互式工具栏,用于捕获用户对 UI 元素的选择操作。 -
编辑器扩展 (Stagewise for VS Code/Cursor):作为连接浏览器和 AI 助手的桥梁,接收来自工具栏的指令,并负责与 MCP 服务器通信。
-
MCP 服务器:处理从浏览器端发送的上下文数据,将其打包成结构化的格式——包含 DOM 结构、截图、元素元数据及样式信息——并最终提交给 AI 代码助手。
此架构确保了 Stagewise 工具栏仅在开发模式下生效,不会侵入项目代码或增加最终生产环境的打包体积。
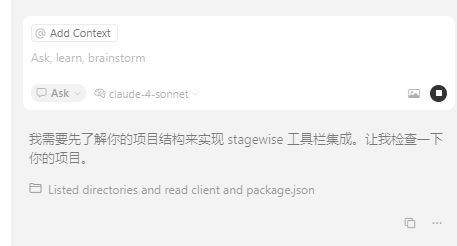
安装与项目配置
集成 Stagewise 至开发环境需完成编辑器扩展安装和项目内工具栏注入两个步骤。
第一步:安装编辑器扩展 在 Cursor 或 VS Code 的扩展市场中搜索“stagewise”并进行安装。安装后,编辑器可能会提示启用 Stagewise MCP 服务器,以允许 AI 调用其提供的工具。
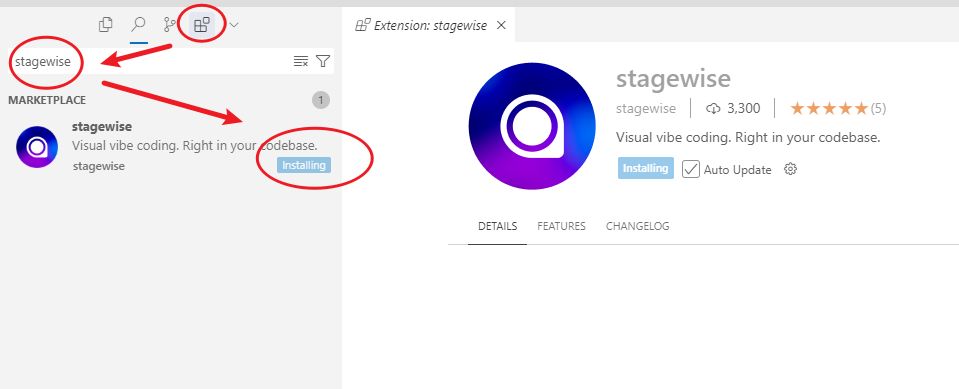
在 Cursor 插件市场搜索“stagewise”并安装
第二步:在项目中注入工具栏 可通过自动化或手动方式将 Stagewise 工具栏集成到项目中。
安装完后会有个界面让你选择是自动配置,还是手动配置
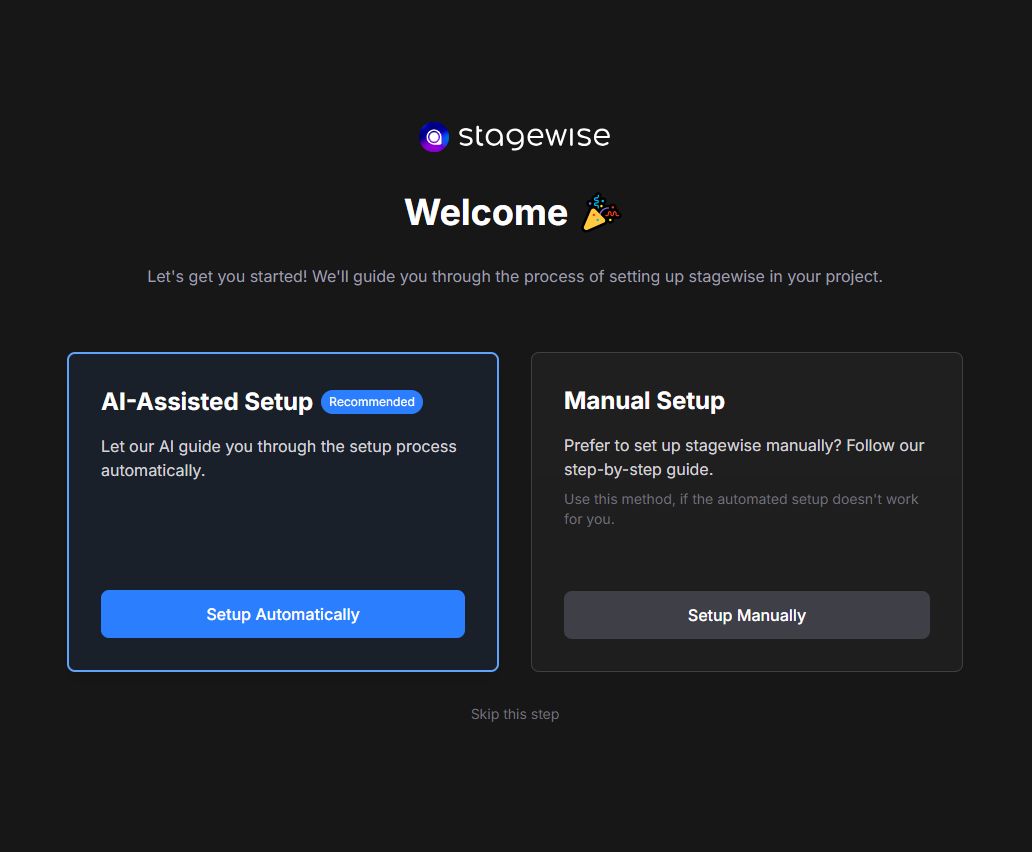
如果你错过了这个页面也可以通过以下方式来配置:
- 自动化配置:建议。在 Cursor 中打开项目,使用快捷键
Cmd+Shift+P(Windows 为Ctrl+Shift+P)调出命令面板,输入并执行setupToolbar命令。Stagewise 将自动分析项目的技术栈(如 React, Next.js, Vue 等),安装相应的依赖包(如@stagewise/toolbar-react),并将工具栏组件注入到项目的根布局文件或主入口文件中。
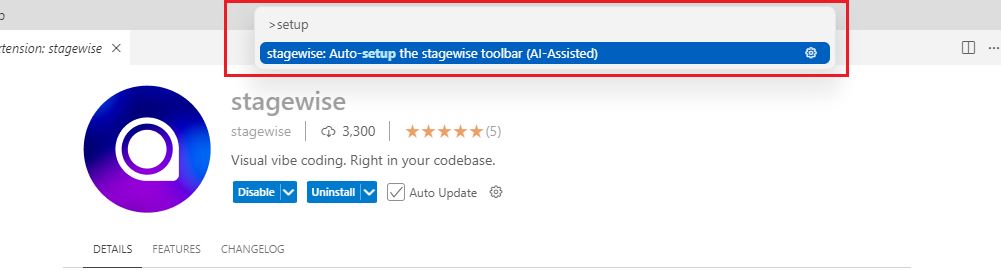
- 使用命令面板自动注入工具栏

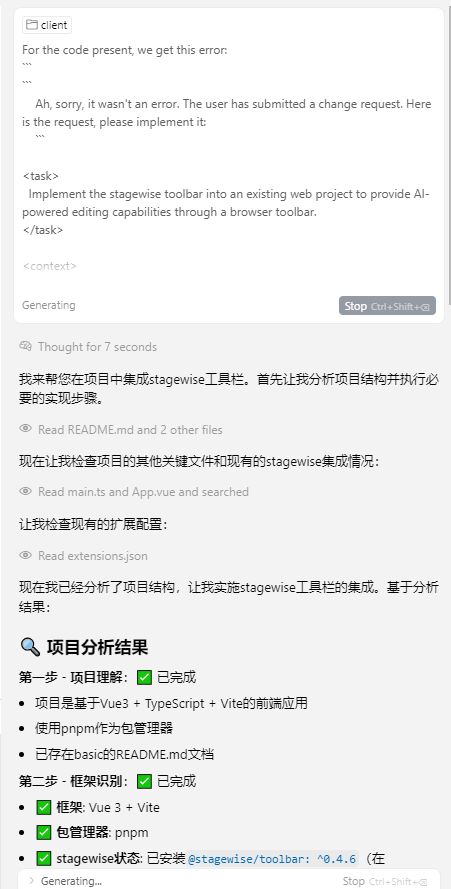
For the code present, we get this error:
    Ah, sorry, it wasn't an error. The user has submitted a change request. Here is the request, please implement it:
    ```

<task>
  Implement the stagewise toolbar into an existing web project to provide AI-powered editing capabilities through a browser toolbar.
</task>

<context>
  stagewise is a browser toolbar that connects frontend UI to coding AI agents in your code editor. It allows developers to select elements in a web app, leave comments, and let AI agents make changes based on that context.
</context>

<requirements>
  1. Install the required stagewise package(s) for the project's framework
  2. Integrate the stagewise toolbar into the project structure (ensure it only runs in development mode)
  3. Add the stagewise extension to the active repositories recommended extensions list. If the list does not yet exist, cretae a new one.
</requirements>

<implementation_steps>
  <step_0>
    Identify the project's package manager (npm, yarn, pnpm, etc.). You must use the same package manager to install the stagewise package.
  </step_0>
  <step_1>
    Identify, if the repository only contains one web app project or multiple. If multiple projects are located inside the repository, ask the user to which project the toolbar should be installed to.
  </step_1>
  <step_2>
    Identify, if the specific project already uses a stagewise package. If so, ask the user if they want to use the existing package or replace it with a new one.
  </step_2>
  <step_3>
    If the project already included stagewise, chek for correct integration and do changes if necessary.
    If the project does not include stagewise, install the appropriate stagewise package and follow the framework specific steps.
    If there is no description on how to install stagewise for the used framework, reject the users request and say that the user needs to install the stagewise package manually.
  </step_3>
</implementation_steps>

<framework_specific_integrations>
  <react>
    Use the `@stagewise/toolbar-react` package for integration.
    Also, install and use the `@stagewise-plugins/react` package for react specific functionality.

    Include the StagewiseToolbar component (exported by the `@stagewise/toolbar-react` package) inside the top-most component of the app.
    Set the `config` prop to an object with the plugins array containing the `ReactPlugin` (exported by the `@stagewise-plugins/react` package).

    Note: The `@stagewise/toolbar-react` package already handles rendering the toolbar only in development mode. The "enabled" prop can be overriden with custom logic to conditionally load the toolbar.
  </react>

  <next>
    Use the `@stagewise/toolbar-next` package for integration.
    Also, install and use the `@stagewise-plugins/react` package for react specific functionality.

    Include the StagewiseToolbar component in the root layout file (layout.tsx).
    Set the `config` prop to an object with the plugins array containing the `ReactPlugin` (exported by the `@stagewise-plugins/react` package).

    Note: The `@stagewise/toolbar-next` package already handles opt-out of SSR so that a simple integration of the component is enough.
    Note: The `@stagewise/toolbar-next` package already handles rendering the toolbar only in development mode. The "enabled" prop can be overriden with custom logic to conditionally load the toolbar.
  </next>

  <vue>
    Use the `@stagewise/toolbar-vue` package for integration.
    Also, install and use the `@stagewise-plugins/vue` package for vue specific functionality.

    Add the StagewiseToolbar component to the main App component.
    Set the `config` prop to an object with the plugins array containing the `VuePlugin` (exported by the `@stagewise-plugins/vue` package).
  </vue>

  <nuxt>
    Use the `@stagewise/toolbar-nuxt` package for integration.
    Also, install and use the `@stagewise-plugins/vue` package for vue specific functionality.

    Wrap the StagewiseToolbar component in a ClientOnly component to ensure it only renders on the client side.
    Set the `config` prop to an object with the plugins array containing the `VuePlugin` (exported by the `@stagewise-plugins/vue` package).
  </nuxt>

  <svelte>
    Use the `@stagewise/toolbar` package for integration.

    If the project is using SvelteKit, put the following code into the `hooks.client.ts` file:
    ```ts
    import { initToolbar } from '@stagewise/toolbar';

    export function init() {
      // Keep other functionality that may already exist in the file
      // Just add the below initToolbar call (conditionally, depending if a dev mode is detected)

      // If the users uses other existing metrics to check for dev mode, use that instead of import.meta.env.DEV
      if (import.meta.env.DEV) {
        initToolbar({
          plugins: [],
        });
      }
    }
    ```

    If the project is using Svelte without SvelteKit, put the following code into the `main.ts` file (or any other file that is the entry to the app):
    ```ts
    import { initToolbar } from '@stagewise/toolbar';

    initToolbar({
      plugins: [],
    });
    ```
  </svelte>
</framework_specific_integrations>

<workspace_extensions_list>
  The recommended extensions lsit for a workspace is located in the root fo the workspace and has the filename "extensions.json".

  <example_list>
    {
      "recommendations": ["dbaeumer.vscode-eslint", "esbenp.prettier-vscode"]
    }
  </example_list>

  <requirement>
    Make sure, that the stagewise extension is added to the recommended extensions list if it is not already present. The name of the extension is "stagewise.stagewise-vscode-extension".

    If the list does not yet exist, create a new one with the following content:
    <new_list_content>
      {
        "recommendations": ["stagewise.stagewise-vscode-extension"]
      }
    </new_list_content>
  </requirement>
</workspace_extensions_list>

<expected_outcome>
  A properly integrated stagewise toolbar that:
  1. Appears only in development mode
  2. Is not included in production builds
  3. Does not lead to any linting errors
  4. Is loaded once on initial opening in the browser
  5. Is only executed in the browser and not any SSR or server environment
</expected_outcome>
How can I resolve this? If you propose a fix, please make it concise.
重新来:
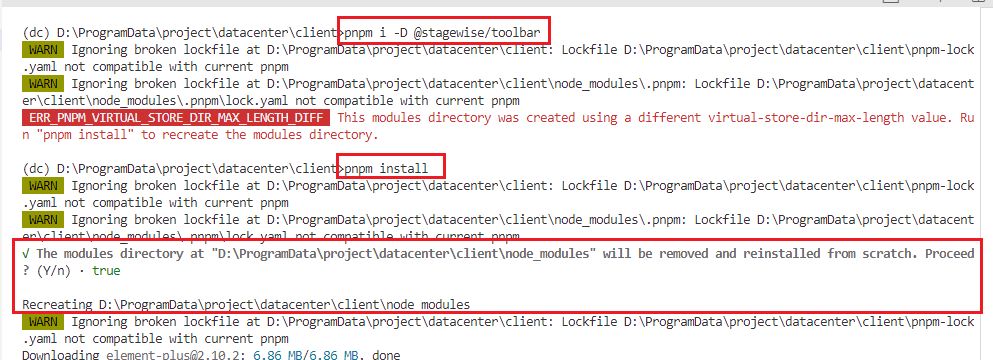
- **手动配置**:麻烦点。开发者也可以选择手动安装依赖包(例如`pnpm i -D @stagewise/toolbar`),并在项目入口文件中通过`initToolbar`函数或框架特定的组件(如Vue中的`<StagewiseToolbar>`)进行初始化。此方法提供了更高的灵活性,**适用于自动化配置失效或需要深度定制的场景**。
小插曲
可以参考前面自动配置中,在我的vite+ts项目中,main.ts里添加了这么一段

### 可视化交互工作流
配置完成后,在开发模式下运行前端项目,浏览器页面底部将出现一个悬浮的Stagewise工具栏。

集成后的工具栏固定在网页底部
整个交互流程如下:
1. **元素选择**:点击工具栏进入选择模式,鼠标悬停在任意UI元素上会显示高亮选择框。点击“+”号或元素本身即可完成选择。按住`Shift`键可同时选择多个元素。

1. 通过点击选择框选中UI元素
2. **指令输入与发送**:在选定目标元素后,于工具栏的输入框中键入具体的修改需求,例如“将选中的按钮由黑色变成蓝色”。
3. **生成结构化请求**:点击发送后,Stagewise会将用户指令和捕获到的元素上下文信息整合成一个结构化的XML格式请求,并自动发送给Cursor。该请求包含了明确的用户目标 (`<user_goal>`)、当前页面URL (`<url>`)以及一份关于选中元素的详细报告 (`<selected_elements>`),其中包含元素的HTML标签、CSS类、属性、文本内容、父级元素结构和计算后的样式。
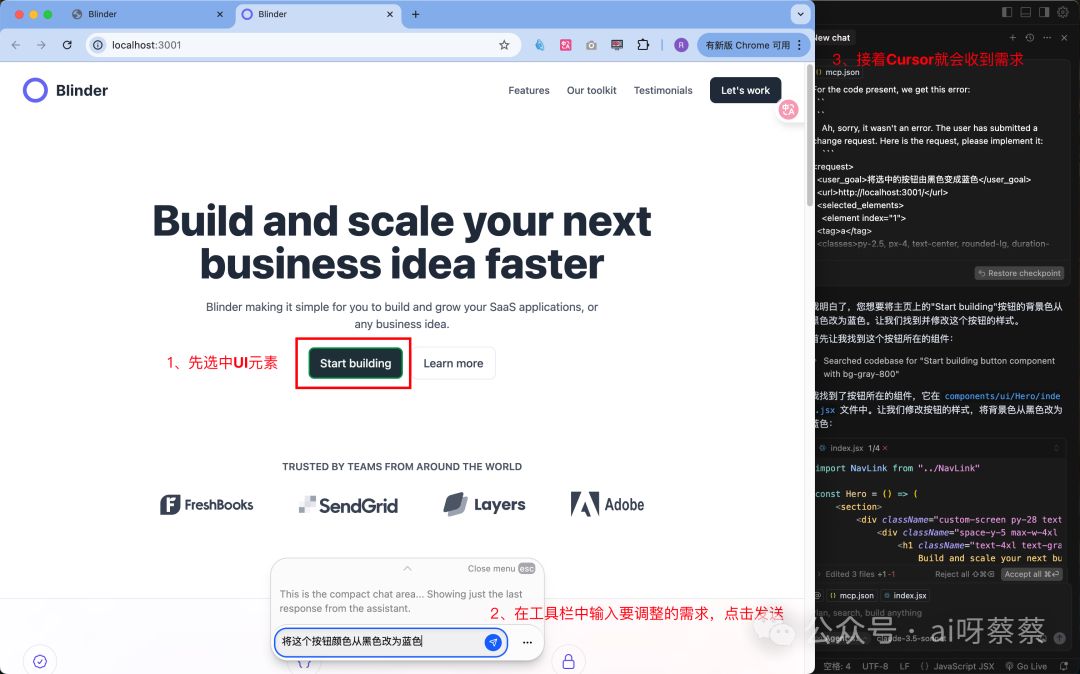
1. Stagewise生成并发送给Cursor的结构化提示词
这种富含上下文的精确指令,使AI能够准确理解修改意图并定位到相关代码,从而执行修改。
### 应用场景与使用要点
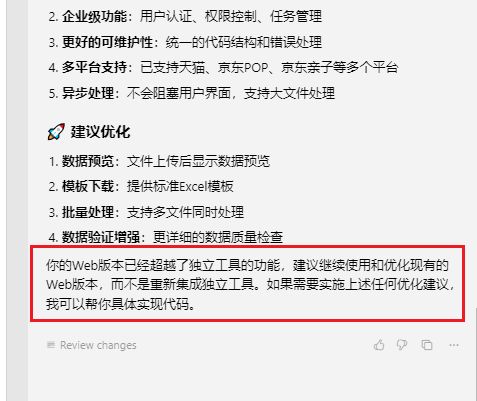
Stagewise的应用不止于简单的样式调整。对于复杂的布局修改,如调整卡片内图片与文字的排列关系,开发者同样可以通过多选元素并发出指令(例如:“让图片在左边,标题和价格在右边,并垂直居中对齐”)来实现。这种可视化操作显著降低了与AI沟通复杂布局需求的难度。
同时,Stagewise提供了一个插件系统,允许开发者通过编写自定义插件来扩展工具栏的功能,例如添加自定义操作按钮或向AI提供额外的上下文信息。
在使用时需注意以下几点:
- 每当处理一个新的Web项目时,需要重新执行一次`setupToolbar`命令。
- 同时在编辑器中打开多个集成了Stagewise的项目,可能会导致消息传递异常,建议一次只在一个项目中激活使用。
### 总结
Stagewise通过为AI代码助手提供“眼睛”,有效弥合了前端开发中视觉反馈与代码实现之间的鸿沟。它将传统基于文本描述的交互模式,升级为一种直接、可视化的“指哪打哪”工作流。通过向AI提供精确且结构化的UI上下文,该工具显著提升了AI在前端开发任务中的准确性和效率,使开发者能够更专注于创造性的工作,而非在与AI的反复沟通中消耗精力。